
Connect your WhatsApp number
This is the step that turns a Wap2b login into a working WhatsApp business number. It happens on Meta's own screens — Wap2b opens them and picks up where they leave off.
Set aside ten uninterrupted minutes. The flow does not save halfway.
Before you start
You need:
- A Facebook account you can log in to, which is an admin of your business in Meta Business Manager. Use an established profile — brand-new Facebook profiles are often restricted by Meta and the flow fails without explaining why.
- The phone number, with the handset nearby. Meta sends a code to it.
- A live business website showing what you sell. Meta checks it.
- Your business to be legally registered. This is not open to individuals.
First: which kind of number is this?
The answer changes one setting, and getting it wrong is the single most common reason a connection completes but cannot send.
If the number is already on the WhatsApp Business App and you want to keep using the app on your phone, choose that option inside Meta's flow (this is called coexistence). Leave two-step verification exactly as it is — this path does not need it changed. The screens differ from Meta's asset-sharing step onward, so follow Connect a WhatsApp Business App number instead of this page — it walks the whole flow with screenshots.
For any other number, open WhatsApp on that phone and go to Settings → Account → Two-step verification. If it is on, turn it off before you continue.
Why this matters
With two-step verification left on, the connection still finishes — but WhatsApp will not issue the certificate needed to register the number. It sits on Pending, nothing explains why, and you have to turn the setting off and connect again.
Steps
-
In Wap2b, open Connect a number.
-
Click Continue with Facebook. Meta's window opens.
-
Log in to your Facebook account.
-
Complete your business profile: your business name, country and website, then Next. The website has to be live and show what you sell.
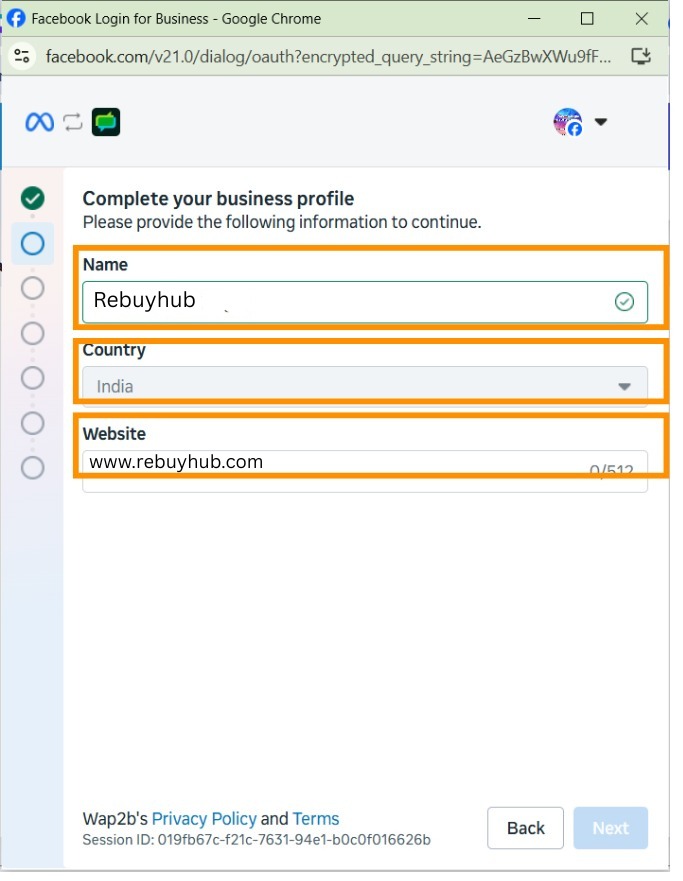
Use your registered or trading name here, not a slogan. -
Select the business assets to share. Pick your business portfolio if you already have one, or create one. Then, in the WhatsApp Business account dropdown, choose Create a WhatsApp Business account.
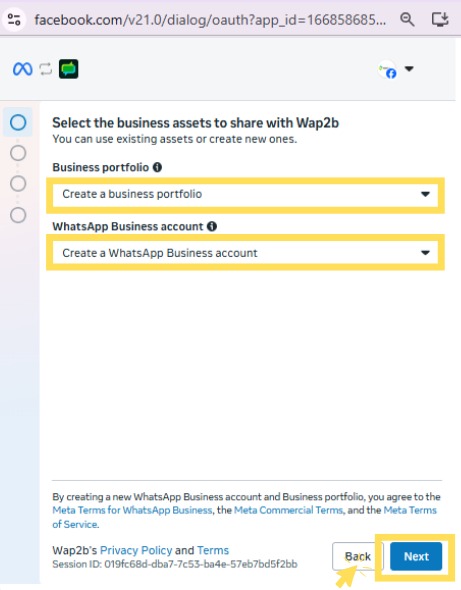
The WhatsApp Business account must be a new one. The business portfolio does not have to be. The WhatsApp Business Account has to be a new one
Your prepaid Wap2b balance can only pay for messages on a WhatsApp Business Account created during this signup. Register the number under an account you already own and it keeps that account's own billing setup — the connection finishes, and the number can never send.
Nothing on our side can attach it afterwards. The number has to be connected again from the start, so it is worth getting right the first time.
-
Enter the phone number and verify it with the code Meta sends by SMS or call.
-
Set the display name — the name customers see above the chat. It must relate to your business; Meta rejects names that do not.
-
Review what you'll share with Wap2b and click Confirm. This grants Wap2b the access it needs to manage the account and send on your behalf.
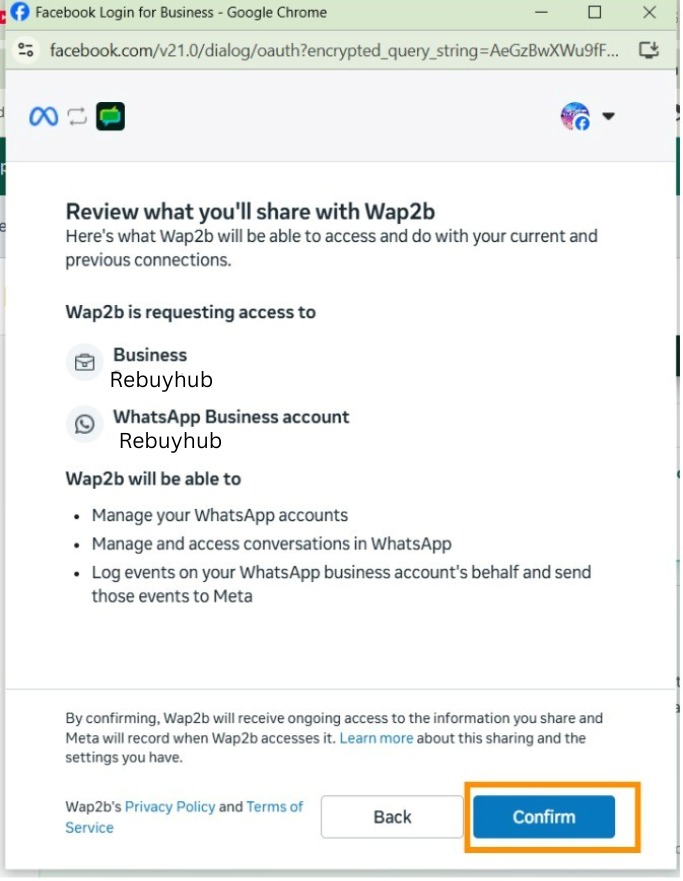
The last screen. Confirm closes Meta's window. -
The window returns you to Wap2b. Your number appears under Phone numbers.
What you will see in Meta afterwards
To send on WhatsApp, Meta requires a payment method on the account. Wap2b sets one up for you automatically, through our messaging partner, in the minutes after you connect. You do nothing.
In Meta Business Manager, under Payment method, you will therefore see an entry naming our messaging partner rather than your own business. That is expected and correct — it is how your messages are paid for on Meta's side.
You never add a card to Meta
You are only ever billed by Wap2b, from your prepaid balance. If anything suggests adding your own card or bank details in Meta Business Manager, you do not need to — and you should not.
Connected is not the same as ready to send
This trips up nearly everyone, so it is worth stating plainly:
A number can show as connected and still be unable to send a single message. Sending needs three things, and connecting only delivers the first:
- The number is registered with Meta. ✅ done by the steps above.
- The payment method is set up on the account. This happens automatically within a few minutes of connecting, but it is a separate step and it can fail.
- You have funds in your Wap2b balance. See Add funds.
Check the status on Phone numbers. If the number is not yet able to send, it says so there.
If something goes wrong
- The number finished setup but cannot send. Almost always two-step verification. Turn it off on the handset and connect the number again.
- The payment method is still not set up after an hour. Open a ticket — this one needs us, you cannot fix it from your side.
- Meta rejected your display name. Names must reflect the business. Try your registered or trading name rather than a slogan or a product name.
- The Facebook window closed or errored partway. Nothing is saved halfway. Start again from Connect a number — repeating the flow is safe.
- "You do not have permission for this business." You are not an admin of the Meta business. Whoever owns it must make you one, or run the flow themselves.
- You picked an existing WhatsApp Business Account by mistake. Nothing can be repaired after the fact. Run the flow again from the start and take Create a WhatsApp Business account at step 5.
- You want a second number. Repeat the same flow. Meta allows two numbers per business portfolio to start with, rising to twenty as your business verifies and your volume grows.
Next
Add funds to your balance — a connected number still needs credit before it can send.
Bringing across a number that is already on the WhatsApp Business App? Take Connect a WhatsApp Business App number first — it is the same flow with different screens partway through.